There are a number of different ways of creating these, and this is my way!
Materials needed:
 Fabric of your choice – enough
for 4 collar pieces (approx. 30cm x 30cm)
Fabric of your choice – enough
for 4 collar pieces (approx. 30cm x 30cm)- 2 pieces of ribbon, about 30 cm in length and 5mm wide
- Paper pattern of collar piece – can be traced or printed from here
- Thread
- Pins
- Needle
- Sewing machine (although could be done by hand)
- Buttons, beads or sequins for embellishing

- Using paper pattern, cut 4 collar sections. I've used 2 different fabrics, one for the main fabric and one as the lining.

- Place one collar piece right side up. Pin one end of a piece of ribbon at the 'stumpy' end of the collar, with the long tail of the ribbon lying inwards – see photo.

- Place another collar piece on top, right sides together and pin in place.

- Leaving an opening of approx. 1.5 inches on one edge, machine stitch around the collar (with a 3/8" seam allowance). I've done mine on the inside curve but would probably try it on the outside curve next time. Be careful not to catch the ribbon in your sewing; you can use the opening to keep the ribbon out of the way.

- Trim corners and clip seams.

- Turn inside out. Press.


- Blind stitch the little opening, or you can top stitch the whole collar piece.

- Now repeat from point 2 for your second collar piece.

- Using needle and thread, stitch your two pieces together (as shown in photo).
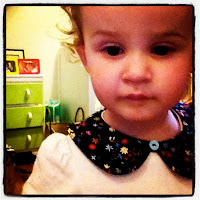
- You can sew a button or bead in the centre of the collar if you fancy it! Buttons look particularly cute on little girls!

 You could of course use this as a base and add additional embellishments on the collar, either on your finished piece or before stitching it together. It's also possible to make it a safer fashion accessory for little ones by extending the length of the pieces (at the end where you'd normally put the ribbon) and attach velcro tabs instead.


As this is my first tutorial I would appreciate your feedback!
Thanks!
This is so cute! I've been wondering how to make one of these for ages :)
ReplyDeleteHannah xx